Thursday, November 29, 2018

2D Week 14 Round 5

This week my team worked on polishing a few more small details to make the scene feel alive.  I assisted the technical artists with lighting and issues that arose in UE4. I also created some vegetation cards to help cover the ground with a more dense forestry appearance. I also coordinated with our lighting lead to help create the scene's new setup.


Monday, November 26, 2018

3D Week 14 Environment Round 2


This week I worked on furthering my high poly sculpt and getting it to a form that I thought was sufficient for the final posing.  Next round I will finish the final details and refinement of all models and begin resurfacing them.  I also encountered some issues with Zbrush that required me to recreate my Ent model from scratch but I also began creating the vegetation assets for my environment this round. Below is the current state of the Ent model and the vegetation I created applied to planes in Maya.  Time restraints have also required me to remove the background birch trees and replace them with the rock assets I have modeled.


Monday, November 19, 2018

3D Week 13 Round 1 Proxy Pass Ent Environment Model

This week I started my final project for the semester, which is to model a small portion of an environment with a tree as the focus asset of the scene.  Of course hearing this I decided to model a tree Ent version of my favorite type of tree, Birch!  So to start I created a reference document of all the imagery I would like to include for this project.  The trees will of course be birch trees and the Ent will also be birch wood.  The season is fall because of the incredible contrast of red and orange against the white bark of birch wood.  And the rocks will be mossy rounded forms that will have the moss later textured on.  Using these references I created the concept art for my Birch Ent character, it was important to have a solid concept for him before beginning modeling anything.


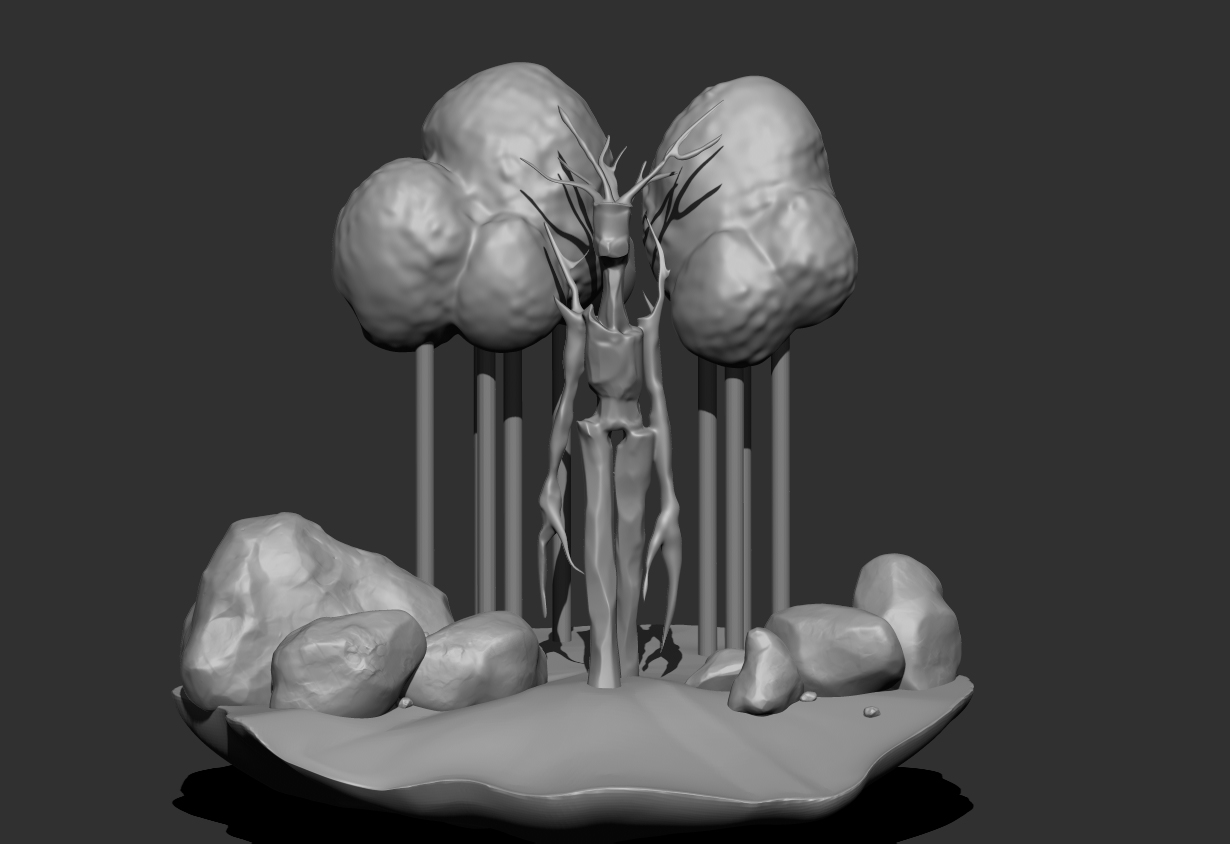
Here is the first pass of the scene that I created to just block out what I wanted from the model and the positioning of the Ent.  I decided to work entirely in Zbrush for the proxy modeling to practice working from large to medium to small details.


And here is the refined proxy pass after further sculpting some details in Zbrush! Obviously there is going to be much further refinement but I plan to utilize the nifty program substance designer to create tiling textures and bring this scene out further in the Unreal Engine.


Here is the first pass of the Rock set I will be using in the scene, we needed to have multiple scales so there is of course large, medium, small, and tiny rock size.  I will be using substance designer to create the mossy texture I want in the final work.


Thursday, November 15, 2018

2D Week 13 Round 4

This week we focused on fixing some of the technical issues we had discovered and fleshed out the 3D environment a bit more.I modeled a simple fish model for one of the tech artists who was focused on rigging some of the flora and fauna for future animations.  I also adjusted the scale of the elevator models and the color materials in the vestibule to create some variation. Per our feedback I created a proxy model of the grand clock our art director designed for the vestibule wall so it didn't look as barren. The tech artists and myself worked out the navmesh issues to create the movement mechanic and worked with the environment lead to work out the new scale we will be working towards in the arboretum.
Here are some of the models rendered in Maya before being moved to UE4.


And here are the models after being imported to the UE4 level as well as some of the material modifications I made to the vestibule to create some visual variation in color.


Monday, November 12, 2018

3D Week 12 Substance to UE4

This week I took the Substance painter work I created last week and exported all the bake map and painted information as texture maps. Then I imported those into the Unreal Engine and created a material from these texture maps and applied the texture to the imported low poly game resolution model.


Thursday, November 8, 2018

2D Week 12 Concept round 3

This week my our team focused more on refining the level and 2D designs to a more articulated concept.  As project lead I coordinated meetings and tasks with the art director for the team to work on this week, this included breaking down the new proxies and polished models we needed for this week and assigning them to the the 3D modelers.  Our art director encountered some car issues so it fell to me as project lead to manage the team and make sure everyone knew exactly what was needed.  This also included explaining to the team what was expected from their tasks and the easiest process to complete them.  I also focused on creating concept art for the arboretum environment this round.  Another task this week was working with our tech artist to solve the Navmesh issue we encountered when testing the VR functionality and fixing the UV's on our models so that they interacted with the lighting properly.

Below is the 3D screenshot I took of the level for paint over purposes

 And here is the paint over I did for the arboretum concept.

Monday, November 5, 2018

3D Week 11 Game Res Model, UV's, and Bake Maps

This week I took the high res sculpt I created in Zbrush and brought it into Maya and resurfaced the topology to create a game res version of the model.  Then I created the UV layout for the model and exported the FBX file and brought it into Substance Painter.  Once in Substance Painter I created the bake map information for the game res model using the high res sculpt and created some simple color information for the next week.


Thursday, November 1, 2018

2D Week 10 Concept Round 2 Crowned Hog

This week the team further revised the concepts down and decided on what scene to model for our VR game level.  Members of the team including myself then modeled proxy objects to become place holders in the UE4 level. I also coordinated with the art director and the lighting lead on how to progress with lighting the level.  I also set up the perforce level and added the assets to the project for the environment lead to assemble.  Below are the proxy models I created for the VR level rendered in Maya and in the UE4 engine as well, the assembled level for proxy testing, and the checklist of assets we decided upon for the level.